Data science benchmark example
Do you like DrivenData or Kaggle competitions ? Would you like to be able to reproduce some of them locally ? Let's see how you can do this in minutes with pytest and a few plugins.
Motivation
a- Research
Most experimental data science papers nowadays include results tables at the end of the paper, where typically there is one entry per dataset per configuration to try (parameters). To produce these tables, we collectively spend a significant amount of coding and debugging time that could be devoted to more interesting matters (such as focusing on improving the core algorithms).
b- Industry
A frequent need for teams industrializing data science software bricks is to be able to test them against a large quantity of datasets, in other words to create a reference benchmark. Teams might have two objectives in mind:
- getting an overview of the performance of a single algorithm on a large quantity of cases, so as to be sure of its genericity
- comparing several algorithms or several configurations, to see which one is the best overall and on specific cases.
What is missing today ?
It is obviously quite trivial to start developing a benchmark engine: a couple for loops can do the trick. However as soon as one wishes to
- run each evaluation in an independent context (possibly distributed on several processors/platforms)
-
and for each evaluation, get an independent capability to:
- Log (see what has been done)
- Debug (understand why it does not work as expected)
- Profile (understand what takes time to potentially improve speed)
Then one finds out that it is a bit more complex to develop. And by taking a step back we find that pytest and its ecosystem (pytest-profile, pytest-logging, pytest-xdist...) already provide all of this (plus a nice integration in your IDE) !
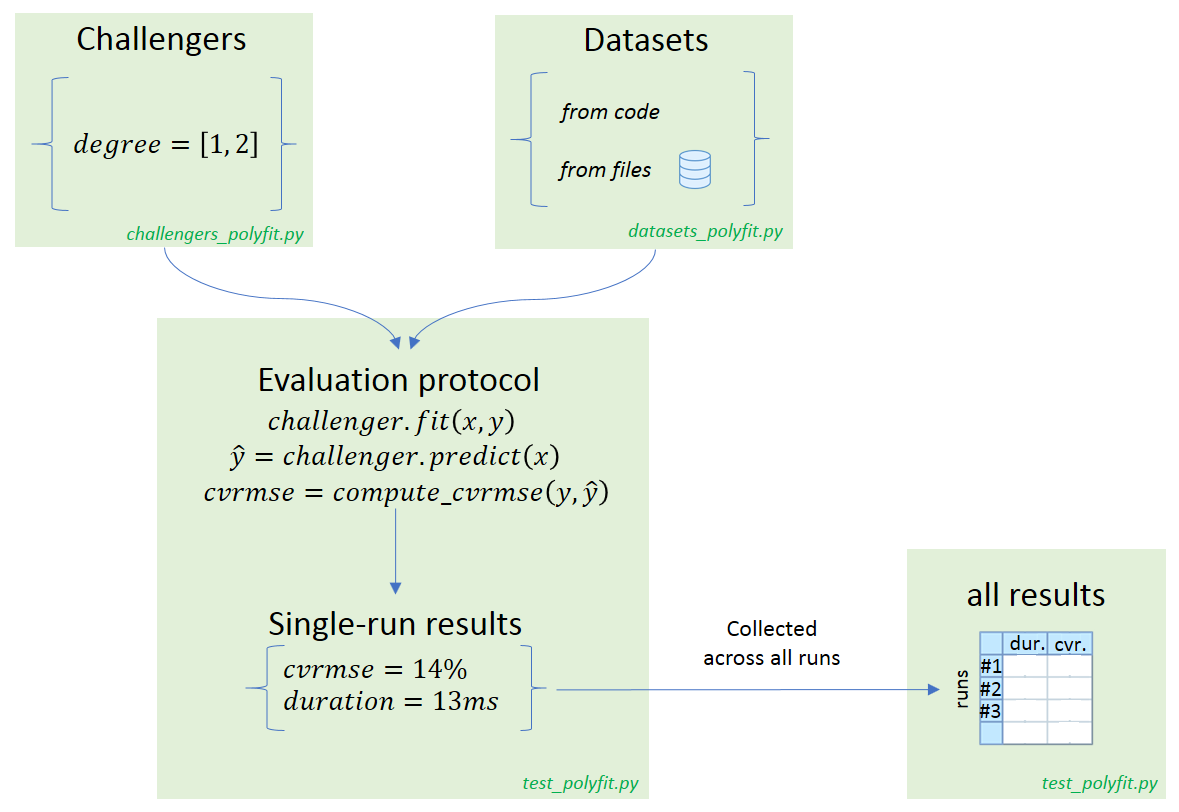
Example description
In this simple example we will benchmark the np.polyfit function, that fits polynomial functions. Our benchmark activity is described by three axis of variability: challengers (this encompasses both variability in algorithms and parameters), datasets, and evaluation protocol.
You can download all the python scripts from this example here.
a- Challengers
The polyfit function has a degree parameter allowing to restrict the polynomial order of the function. We will compare two configurations:
- degree = 1 (linear regression)
- degree = 2 (quadratic).
b- Datasets
We both want to test the algorithm against:
- datasets generated from python code (in this example we will generate the famous Anscombe's quartet)
- datasets provided as csv files
In real world applications it makes sense to use code to generate edge/challenging cases while continuing to use data files to represent "typical" datasets (real-world data).
c- Evaluation protocol
Our evaluation protocol will be very basic:
- fit a model to the data,
- apply the model to the same dataset to get predictions
- compute accuracy using the CV-RMSE metric
Summary
To sum-up, we would like to execute all experiments described in the following plots (one plot per dataset):
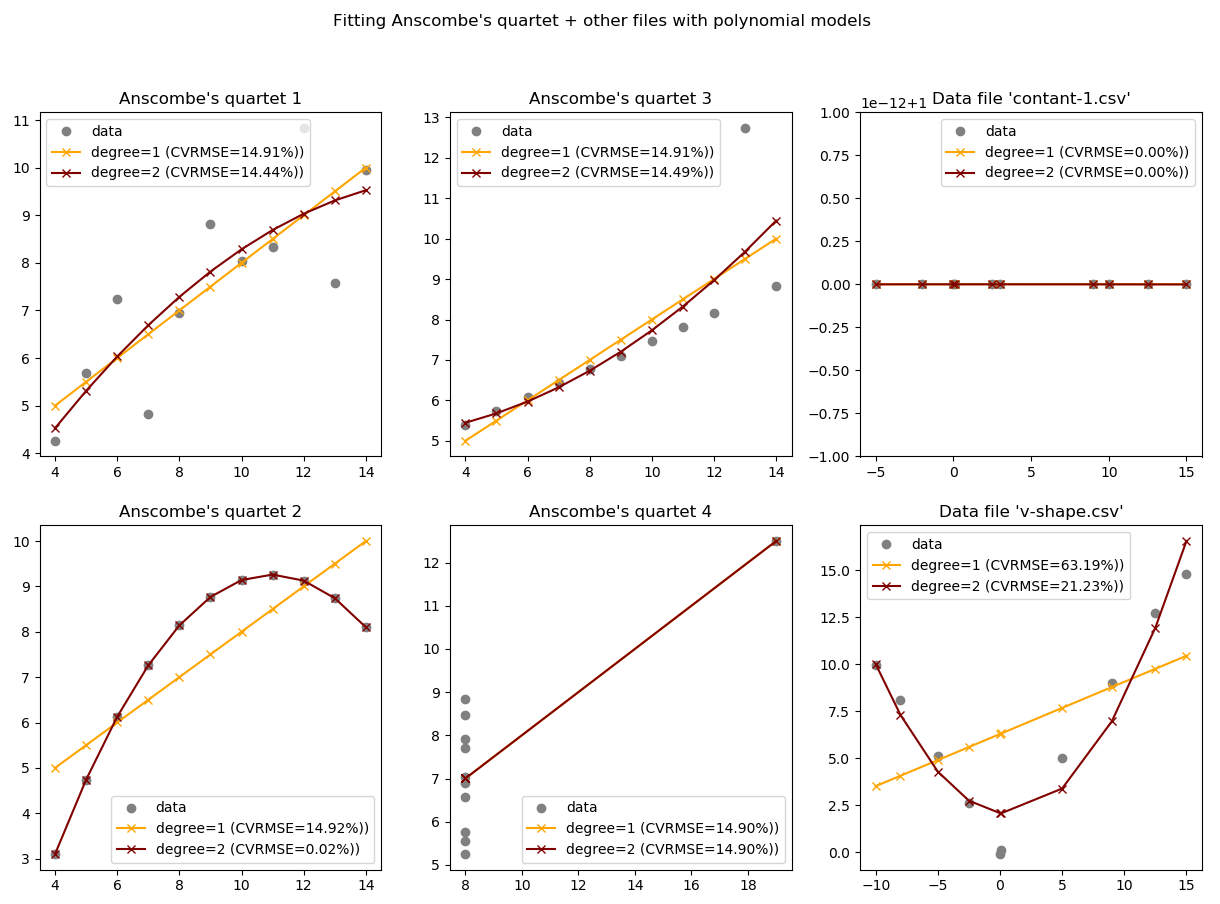
Note: these plots have been generated with the "advanced" data science benchmark example.
Executing the example
a- Requirements
The files required to run this example are located in the data_science_benchmark/ folder, available here.
To use this code you have to install pytest, as well as two dependencies:
- pytest-cases to separate test code (the evaluation protocol) from test data (the datasets)
- pytest-harvest to collect applicative results from all runs and create the final synthesis table
>>> pip install pytest-cases
>>> pip install pytest-harvest
This example also requires numpy (for the polyfit method) and pandas (for synthesis table creation).
>>> [conda/pip] install pandas numpy
b- First run
Go in the example's folder and execute pytest, either from your favorite IDE or using a commandline:
>>> pytest data_science_benchmark/ -v
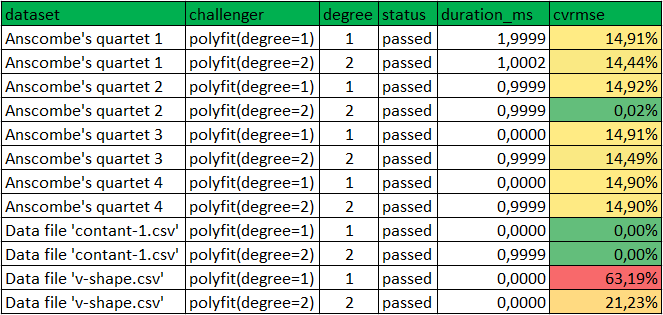
You should see 13 test executions:
============================= test session starts =============================
...
collected 13 items

test_polyfit.py::test_poly_fit[polyfit-degree=1-anscombes_quartet-id=1] PASSED
test_polyfit.py::test_poly_fit[polyfit-degree=2-anscombes_quartet-id=1] PASSED
test_polyfit.py::test_poly_fit[polyfit-degree=1-anscombes_quartet-id=2] PASSED
test_polyfit.py::test_poly_fit[polyfit-degree=2-anscombes_quartet-id=2] PASSED
test_polyfit.py::test_poly_fit[polyfit-degree=1-anscombes_quartet-id=3] PASSED
test_polyfit.py::test_poly_fit[polyfit-degree=2-anscombes_quartet-id=3] PASSED
test_polyfit.py::test_poly_fit[polyfit-degree=1-anscombes_quartet-id=4] PASSED
test_polyfit.py::test_poly_fit[polyfit-degree=2-anscombes_quartet-id=4] PASSED
test_polyfit.py::test_poly_fit[polyfit-degree=1-csvfile-contant-1] PASSED
test_polyfit.py::test_poly_fit[polyfit-degree=2-csvfile-contant-1] PASSED
test_polyfit.py::test_poly_fit[polyfit-degree=1-csvfile-v-shape] PASSED
test_polyfit.py::test_poly_fit[polyfit-degree=2-csvfile-v-shape] PASSED
test_polyfit.py::test_synthesis PASSED

========================== 13 passed in 0.67 seconds ==========================
You should also see
- a new folder created:
logs/, containing one log file for each test run, for exampletest_poly_fit[polyfit-degree=1-anscombes_quartet-id=1].log:
INFO     algo:test_polyfit.py:47 fitting model
INFO     algo:test_polyfit.py:52 predicting
INFO     algo:test_polyfit.py:56 evaluating error
- a new file created:
polyfit_bench_results.csv. This file contains the benchmark results table. There are 12 rows corresponding to {2 challengers} x {6 datasets}.
c- Optional: summary plot
If you install matplotlib, you will also see some synthesis plots:
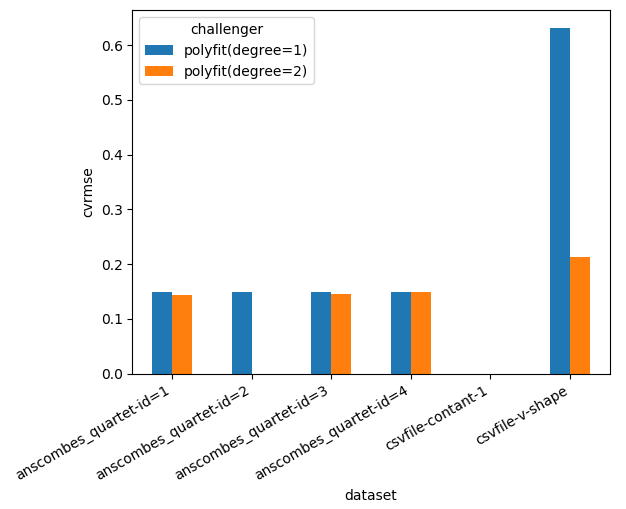
Note that the tests will end when you close the figure. See matplotlib documentation for details.
d- Optional: tabulate
If you install tabulate and enable the -s flag you will be able to see the table nicely printed in your console too:
>>> pip install tabulate
>>> pytest data_science_benchmark/ -v -s
e- Optional: pytest filtering
Since pytest is the engine used behind the scenes, there are a number of things you can do directly. For example you can run only a subset of all cases by using your IDE integration, or by using pytest commandline filters or markers. For example
>>> pytest data_science_benchmark/ -v -k "test_poly_fit[polyfit-degree=2-ansc"
Will only run the 4 following cases:
============================= test session starts =============================
...
collected 13 items

test_polyfit.py::test_poly_fit[polyfit-degree=2-anscombes_quartet-id=1] PASSED  [ 25%]
test_polyfit.py::test_poly_fit[polyfit-degree=2-anscombes_quartet-id=2] PASSED  [ 50%]
test_polyfit.py::test_poly_fit[polyfit-degree=2-anscombes_quartet-id=3] PASSED  [ 75%]
test_polyfit.py::test_poly_fit[polyfit-degree=2-anscombes_quartet-id=4] PASSED  [100%]

===== 9 tests deselected by '-ktest_poly_fit[polyfit(degree=2)-Anscombe' ======
=================== 4 passed, 9 deselected in 0.07 seconds ====================
This might be particularly interesting to debug particular cases, or to perform profiling on only a subset (see below).
f- Optional: pytest profiling
Since pytest is the engine used behind the scenes, there are a number of plugins available! This one is a good example. Simply install pytest-profiling and execute the benchmark with the --profile-svg flag. Here we use a filter to focus on the "evaluation" nodes and skip the synthesis code that is less interesting to profile.
>>> pytest data_science_benchmark/ -v -k "test_poly_fit" --profile-svg
The extract of the generated prof/combined.svg file below shows that this can be a great help to understand where the challengers take time.
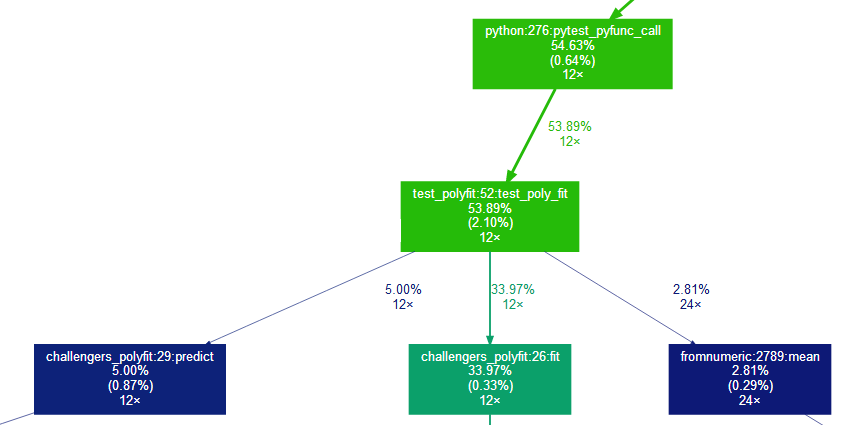
Here 53% of the total python execution time is spent inside the evaluation protocol test_poly_fit. The rest of the time is probably spent in pytest setup and teardown (including setup and teardown of our challenger and dataset fixtures). These 53% can be decomposed in
- 34% for the fit method
- 5% for the predict method
- 2.81% for the cvrmse calculation, where most time is spent in the
np.meanmethod (called twice per run).
Note that pytest-profiling requires graphviz to be installed on your machine. You can install it using conda install if your python distribution is anaconda.
Windows + anaconda users
If you are in this configuration, you might find that the svg file is not generated even though no particular error is encountered. This is a known bug in pytest-profiling that was fixed but we are still waiting for the corresponding release on pypi. In the meantime you can clone the PR locally.
Pycharm + anaconda users
If you are in this configuration and installed graphviz using conda, PyCharm might forget to add it to the system PATH. You have to do it manually. This is a known issue in PyCharm.
Code details
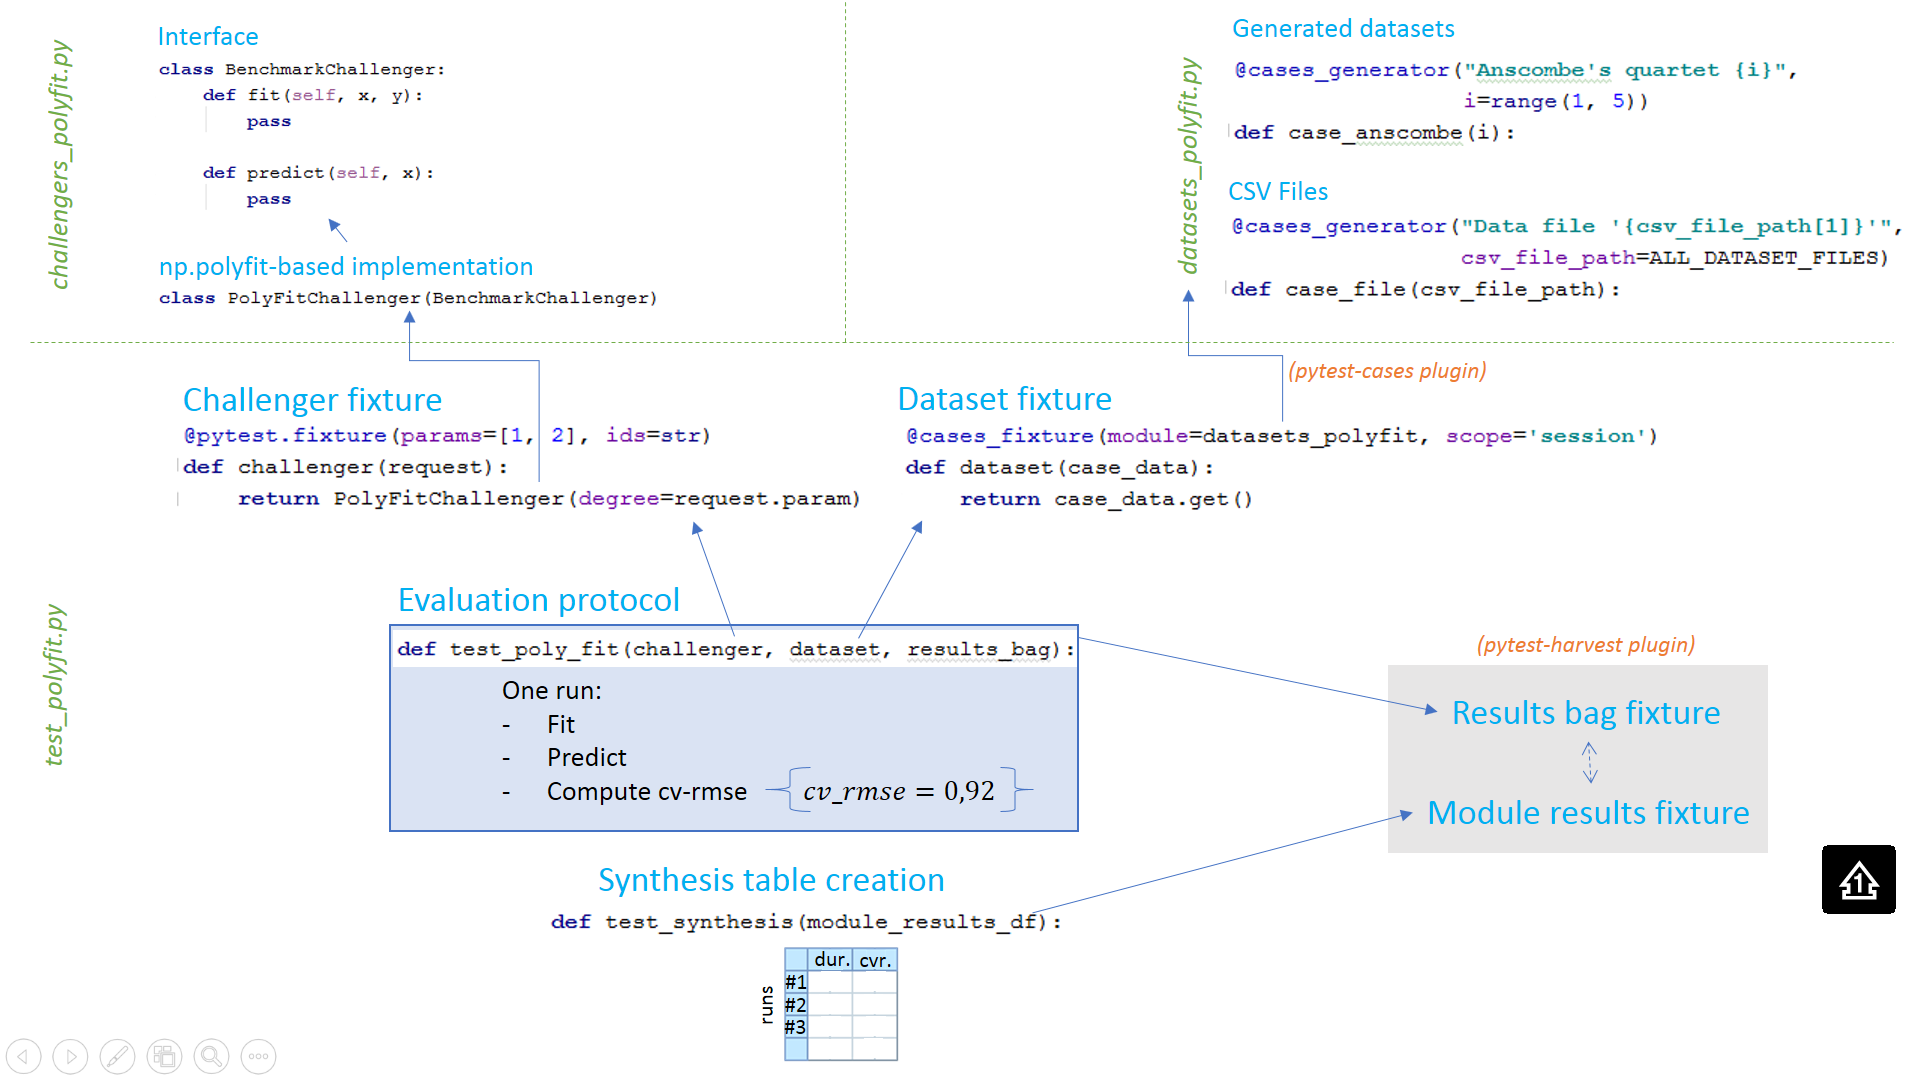
Our solution is made of three files:
test_polyfit.pycontains the benchmark logic: the evaluation protocol and the synthesis table creationchallengers_polyfit.pycontains the code to create the challengers: the two variants ofnp.polyfitwith degree=1 and degree=2datasets_polyfit.pycontains the code to generate or parse (from csv files) the benchmark datasets
a- Evaluation protocol
The first thing to do when creating a benchmark is to create the function that will evaluate each node (i.e. that will correspond to a single row in the results table). For this we create a pytest test function, that is, a function whose name starts with test_. Note: the file name should also start with test_, that's a requirement from pytest.
def test_poly_fit(challenger, dataset, results_bag):
    # Fit the model
    challenger.fit(dataset.x, dataset.y)
    results_bag.model = challenger

    # Use the model to perform predictions
    predictions = challenger.predict(dataset.x)

    # Evaluate the prediction error
    cvrmse = np.sqrt(np.mean((predictions-dataset.y)**2)) / np.mean(dataset.y)
    print("Relative error (cv-rmse) is: %.2f%%" % (cvrmse * 100))
    results_bag.cvrmse = cvrmse
Now we need to tell pytest how to generate the three inputs:
- we need to collect and inject the
challengerobjects, that should implement both afitandpredictmethod - we need to collect and inject the
datasetobjects, that should be tuples(x, y) - we need to inject the
results_bagobjects, where we store our cv-rmse metric, and collect all of them to make the synthesis table
We will perform all of this by relying on the same mechanism: pytest "fixtures". However that would require a significant amount of code so we rely on plugins to help us on the way.
b- Challengers
We create a challenger fixture that relies on pytest-cases to gather all case functions prefixed with algo_ from module challengers_polyfit.py:
@fixture
@parametrize_with_cases("algo", cases='.challengers_polyfit', prefix='algo_')
def challenger(algo):
    """ A fixutre collecting all challengers from `challengers_polyfit.py` """
    # (optional setup code here)
    yield algo
    # (optional teardown code here)
This fixture is not mandatory (the test itself could be parametrized with the cases directly) but it can be handy to execute some setup/teardown code transverse to all challengers - this is why we show this.
All the code in charge to create the challengers is therefore located in the separate challengers_polyfit.py file. This file is made of two parts:
- Interface -
BenchmarkChallengeris the interface that all challengers should implement to enter the benchmark. Here we define that challengers should implement two methods :fitandpredict.
class BenchmarkChallenger(object):
    def fit(self, x, y):
        pass

    def predict(self, x):
        pass
- Implementation -
PolyFitChallengeris the class representing anp.polyfit-based challenger. This class provides a concrete implementation offitandpredict, based on numpy. It has one remaining parameter in the constructor:degree. It is used to create two challengers with degrees 1 and 2, in the case functionalgo_polyfit
class PolyFitChallenger(BenchmarkChallenger):
    def __init__(self, degree):
        self.degree = degree

    # ... (implementation of `fit` and `predict`)

@parametrize(degree=[1, 2])
def algo_polyfit(degree):
    return PolyFitChallenger(degree=degree)
c- Datasets
Similar to challenger, we create a dataset fixture to gather all case functions prefixed with data_ from module datasets_polyfit.py.
@fixture(scope='session')
@parametrize_with_cases("data", cases='.datasets_polyfit', prefix='data_')
def dataset(data):
    # (optional setup code here)
    yield data
    # (optional teardown code here)
All the code in charge to create the datasets is therefore located in the separate datasets_polyfit.py file. Once again this file first defines the interface, in this case what a Dataset is (a namedtuple):
Dataset = namedtuple("Dataset", ('x', 'y'))
And them the implementation with two main type of dataset generators:
- one to generate data from code. This function creates the 4 datasets known as Anscombe's quartet.
@parametrize(id=range(1, 5))
def data_anscombes_quartet(id):
    if id == 1:
        x = [10.0, 8.0, 13.0, 9.0, 11.0, 14.0, 6.0, 4.0, 12.0, 7.0, 5.0]
        y = [8.04, 6.95, 7.58, 8.81, 8.33, 9.96, 7.24, 4.26, 10.84, 4.82, 5.68]
    elif id == 2:
        x = [10.0, 8.0, 13.0, 9.0, 11.0, 14.0, 6.0, 4.0, 12.0, 7.0, 5.0]
        y = [9.14, 8.14, 8.74, 8.77, 9.26, 8.10, 6.13, 3.10, 9.13, 7.26, 4.74]
    ...
    return Dataset(x, y)
- and another from csv files located in the
datasets/folder.
datasets_dir = Path(__file__).parent / 'datasets'
all_csv_files = [datasets_dir / file_name for file_name in datasets_dir.glob('*.csv')]

@parametrize(csv_file_path=all_csv_files, idgen=lambda csv_file_path: csv_file_path.stem)
def data_csvfile(csv_file_path):
    """ Generates one case per file in the datasets/ folder """
    my_data = np.genfromtxt(csv_file_path, delimiter=',', names=True)
    return Dataset(x=my_data['x'], y=my_data['y'])
Note: the @pytest.mark.parametrize syntax is not yet available for @pytest.fixture (vote for it here!), that is why we use the drop-in replacement provided in pytest-cases named @fixture. We also use the @parametrize variant proposed by pytest-cases to benefit from its additional usability features.
See pytest-cases documentation for details.
d- Results bag and synthesis table creation
The results_bag fixture is automatically created when you install pytest-harvest, according to pytest_harvest documentation. So we have nothing particular to do to have your test function receive it.
If we run pytest at this stage, all combinations of challengers and datasets would be evaluated, and the results_bag of each execution would be stored in the global fixture_store fixture. To retrieve all results and make the final table we simply create an additional test using the module_results_df fixture from pytest-harvest. We can then edit that table according to our display preferences:
def test_synthesis(module_results_df):
    # `module_results_df` already contains everything at this point.

    # For display we rename columns and only keep useful information
    module_results_df = module_results_df.rename(columns={'challenger_param': 'degree',
                                                          'dataset_param': 'dataset'})
    module_results_df['challenger'] = module_results_df['model'].map(str)
    module_results_df = module_results_df[['dataset', 'challenger', 'degree',
                                           'status', 'duration_ms', 'cvrmse']]

    ...
Note that according to pytest_harvest documentation there are many alternate places where you could put this code. I personally like it in a test, because it appears in the IDE pytest tree - but that is not a mandatory feature :) Our only true requirement here is that is runs after all the test_poly_fit[...] test nodes.
e- Logging
With pytest, logging to one file per test is very easy, we follow this suggestion from stackoverflow to dynamically assign the log file name according to the currently executed test id:
# logging configuration
exec_log = logging.getLogger('algo')
logs_dir = Path(__file__).parent / "logs"


@fixture(autouse=True)
def configure_logging(request, caplog):
    """ Set log file name same as test name, and set log level. You could change the format here too """
    log_file = logs_dir / ("%s.log" % request.node.name)
    request.config.pluginmanager.get_plugin("logging-plugin").set_log_path(log_file)
    caplog.set_level(logging.INFO)
See pytest documentation on logging for details.
f- Summary
To sum-up, the code architecture looks like this:
To go further
We describe a few additions to this example in the advanced version